LangChain has been around for a year. As an open-source framework, providing the modules and tools needed to build AI applications based on large models just a few days LangChain officially announced the new library called LangGraph
LangGraph builds upon LangChain and simplifies the process of creating and managing agents and their runtimes.
in this Post, we will introduce a comprehensive of langGraph, what are agents and agent runtimes? what is the Feature of Langgraph, and how to build an agent executor in LangGraph, we going to explore the Chat Agent Executor in LangGraph and How to modify the Chat Agent Executor in LangGraph in humans in a loop and chat
Table of Contents
ToggleBefore we start! 🦸🏻♀️
If you like this topic and you want to support me:
So, what are agents and agent runtimes?
In LangChain, an agent is a system driven by a language model that makes decisions about actions to take. An agent runtime is what keeps this system running, continually deciding on actions, recording observations, and maintaining this cycle until the agent’s task is completed.
LangChain has made agent customization easy with its expression language. LangGraph takes this further by allowing more flexible and dynamic customization of the agent runtime. The traditional agent runtime was the Agent EX class, but now with LangGraph, there’s more variety and adaptability.
A Key Feature
A key feature of LangGraph is the addition of cycles to the agent runtime. Unlike non-cyclical frameworks, LangGraph enables these repetitive loops essential for agent operation.
We’re starting with two main agent runtimes in LangGraph:
-
-
- The Agent Executor is similar to LangChain’s but rebuilt in LangGraph.
- The Chat Agent Executor handles agent states as a list of messages — perfect for chat-based models that use messages for function calls and responses.
-
how to build Agent Executor
building an agent executor in LangGraph, similar to the one in LangChain. This process is surprisingly straightforward, so let’s dive in!
First things first, we’ll need to set up our environment by installing a few packages: LangChain, LangChain OpenAI, and Tavily Python. These will help us utilize existing LangChain agent classes, power our agent with OpenAI’s language models, and use the Tavily Python package for search functionality.
!pip install --quiet -U langchain langchain_openai tavily-python
Next, we’ll set up our API keys for OpenAI, Tavily, and LingSmith. LingSmith is particularly important for logging and observability, but it’s currently in private beta. If you need access, feel free to reach out to Them.
import os
import getpass

os.environ["OPENAI_API_KEY"] = getpass.getpass("OpenAI API Key:")
os.environ["TAVILY_API_KEY"] = getpass.getpass("Tavily API Key:")
os.environ["LANGCHAIN_TRACING_V2"] = "true"
os.environ["LANGCHAIN_API_KEY"] = getpass.getpass("LangSmith API Key:")
Our first step in the notebook is to create a LangChain agent. This involves selecting a language model, creating a search tool, and establishing our agent. For detailed information on this, you can refer to the LangChain documentation.
from langchain import hub
from langchain.agents import create_openai_functions_agent
from langchain_openai.chat_models import ChatOpenAI
from langchain_community.tools.tavily_search import TavilySearchResults

tools = [TavilySearchResults(max_results=1)]

# Get the prompt to use - you can modify this!
prompt = hub.pull("hwchase17/openai-functions-agent")

# Choose the LLM that will drive the agent
llm = ChatOpenAI(model="gpt-3.5-turbo-1106", streaming=True)

# Construct the OpenAI Functions agent
agent_runnable = create_openai_functions_agent(llm, tools, prompt)
We then define the state of our graph, which tracks changes over time. This state allows each node in our graph to update the overall state, saving us the hassle of passing it around constantly. We’ll also decide how these updates will be applied, whether by overriding existing data or adding to it.
from typing import TypedDict, Annotated, List, Union
from langchain_core.agents import AgentAction, AgentFinish
from langchain_core.messages import BaseMessage
import operator


class AgentState(TypedDict):
   # The input string
   input: str
   # The list of previous messages in the conversation
   chat_history: list[BaseMessage]
   # The outcome of a given call to the agent
   # Needs `None` as a valid type, since this is what this will start as
   agent_outcome: Union[AgentAction, AgentFinish, None]
   # List of actions and corresponding observations
   # Here we annotate this with `operator.add` to indicate that operations to
   # this state should be ADDED to the existing values (not overwrite it)
   intermediate_steps: Annotated[list[tuple[AgentAction, str]], operator.add]
After setting up our state, we focus on defining nodes and edges in our graph. We need two primary nodes: one to run the agent and another to execute tools based on the agent’s decisions. Edges in our graph are of two types: conditional and normal. Conditional edges allow for branching paths based on previous results, while normal edges represent a fixed sequence of actions.
We’ll look into specifics like the ‘run agent’ node, which invokes the agent, and the ‘execute tools’ function, which executes the tool chosen by the agent. We’ll also add a ‘should continue’ function to determine the next course of action.
from langchain_core.agents import AgentFinish
from langgraph.prebuilt.tool_executor import ToolExecutor

# This a helper class we have that is useful for running tools
# It takes in an agent action and calls that tool and returns the result
tool_executor = ToolExecutor(tools)

# Define the agent
def run_agent(data):
    agent_outcome = agent_runnable.invoke(data)
    return {"agent_outcome": agent_outcome}

# Define the function to execute tools
def execute_tools(data):
    # Get the most recent agent_outcome - this is the key added in the `agent` above
    agent_action = data['agent_outcome']
    output = tool_executor.invoke(agent_action)
    return {"intermediate_steps": [(agent_action, str(output))]}

# Define logic that will be used to determine which conditional edge to go down
def should_continue(data):
    # If the agent outcome is an AgentFinish, then we return `exit` string
    # This will be used when setting up the graph to define the flow
    if isinstance(data['agent_outcome'], AgentFinish):
        return "end"
    # Otherwise, an AgentAction is returned
    # Here we return `continue` string
    # This will be used when setting up the graph to define the flow
    else:
        return "continue"
Finally, we construct our graph. We define it, add our nodes, set an entry point, and establish our edges — both conditional and normal. After compiling the graph, it’s ready to be used just like any LangChain runnable.
from langgraph.graph import END, StateGraph

# Define a new graph
workflow = StateGraph(AgentState)

# Define the two nodes we will cycle between
workflow.add_node("agent", run_agent)
workflow.add_node("action", execute_tools)

# Set the entrypoint as `agent`
# This means that this node is the first one called
workflow.set_entry_point("agent")

# We now add a conditional edge
workflow.add_conditional_edges(
    # First, we define the start node. We use `agent`.
    # This means these are the edges taken after the `agent` node is called.
    "agent",
    # Next, we pass in the function that will determine which node is called next.
    should_continue,
    # Finally we pass in a mapping.
    # The keys are strings, and the values are other nodes.
    # END is a special node marking that the graph should finish.
    # What will happen is we will call `should_continue`, and then the output of that
    # will be matched against the keys in this mapping.
    # Based on which one it matches, that node will then be called.
    {
        # If `tools`, then we call the tool node.
        "continue": "action",
        # Otherwise we finish.
        "end": END
    }
)

# We now add a normal edge from `tools` to `agent`.
# This means that after `tools` is called, `agent` node is called next.
workflow.add_edge('action', 'agent')

# Finally, we compile it!
# This compiles it into a LangChain Runnable,
# meaning you can use it as you would any other runnable
app = workflow.compile()
We’ll run our executor with some input data to see our executor in action. This process involves streaming the results of each node, allowing us to observe the agent’s decisions, the tools executed, and the overall state at each step.
inputs = {"input": "what is the weather in sf", "chat_history": []}
for s in app.stream(inputs):
    print(list(s.values())[0])
    print("----")
For a more visual understanding, we can explore these processes in LingSmith, which provides a detailed view of each step, including the prompts and responses involved in the execution.
{'agent_outcome': AgentActionMessageLog(tool='tavily_search_results_json', tool_input={'query': 'weather in San Francisco'}, log="\nInvoking: `tavily_search_results_json` with `{'query': 'weather in San Francisco'}`\n\n\n", message_log=[AIMessage(content='', additional_kwargs={'function_call': {'arguments': '{"query":"weather in San Francisco"}', 'name': 'tavily_search_results_json'}})])}
----
{'intermediate_steps': [(AgentActionMessageLog(tool='tavily_search_results_json', tool_input={'query': 'weather in San Francisco'}, log="\nInvoking: `tavily_search_results_json` with `{'query': 'weather in San Francisco'}`\n\n\n", message_log=[AIMessage(content='', additional_kwargs={'function_call': {'arguments': '{"query":"weather in San Francisco"}', 'name': 'tavily_search_results_json'}})]), "[{'url': 'https://www.whereandwhen.net/when/north-america/california/san-francisco-ca/january/', 'content': 'Best time to go to San Francisco? Weather in San Francisco in january 2024  How was the weather last january? Here is the day by day recorded weather in San Francisco in january 2023:  Seasonal average climate and temperature of San Francisco in january  8% 46% 29% 12% 8% Evolution of daily average temperature and precipitation in San Francisco in januaryWeather in San Francisco in january 2024. The weather in San Francisco in january comes from statistical datas on the past years. You can view the weather statistics the entire month, but also by using the tabs for the beginning, the middle and the end of the month. ... 16-01-2023 45°F to 52°F. 17-01-2023 45°F to 54°F. 18-01-2023 47°F to ...'}]")]}
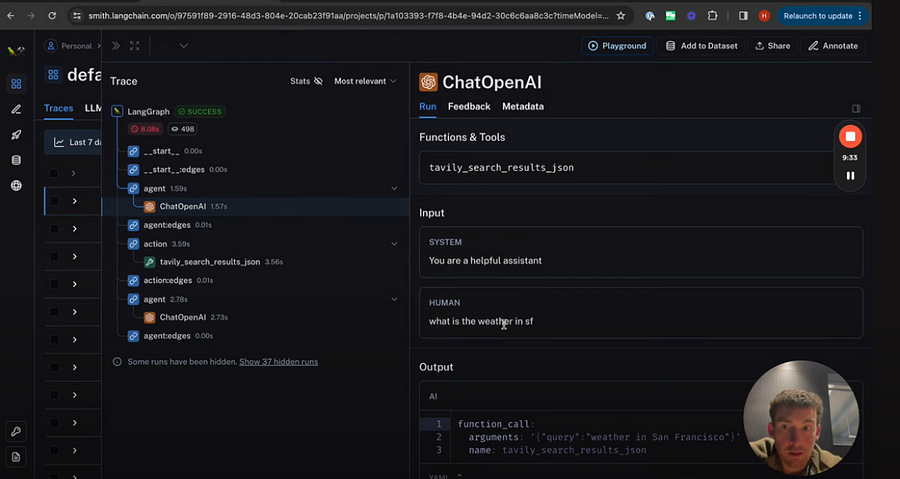
That’s how you create an agent executor in LangGraph, mirroring the functionality of LangChain’s executor. we’ll explore more about the interface of the state graph and different streaming methods to return results.
Else See : AutoGen + LangChian + SQLite + Function Schema = Super AI ChabotExploring Chat Agent Executor
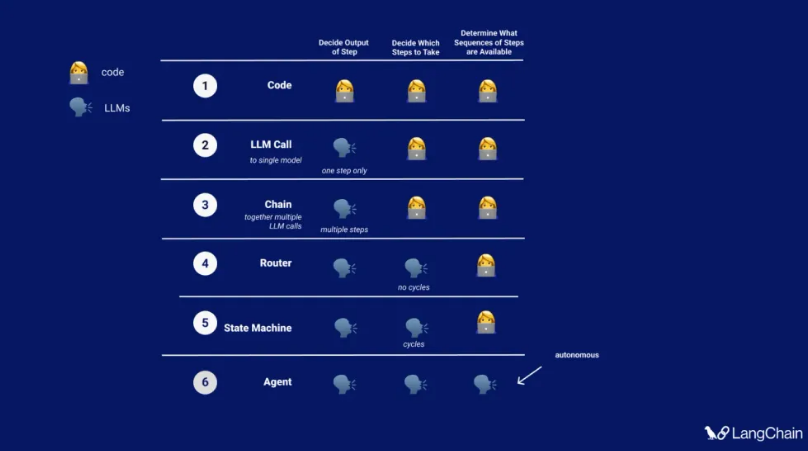
we’re going to explore the Chat Agent Executor in LangGraph, a tool designed to work with chat-based models. This executor is unique because it operates entirely on a list of input messages, updating the agent’s state over time by adding new messages to this list.
Let’s dive into the setup process:
-
-
- Installing Packages: We need the LangChain package, LangChain OpenAI for the model, and the Tavily package for the search tool. Setting API keys for these services is also necessary.
-
!pip install --quiet -U langchain langchain_openai tavily-python
import os
import getpass

os.environ["OPENAI_API_KEY"] = getpass.getpass("OpenAI API Key:")
os.environ["TAVILY_API_KEY"] = getpass.getpass("Tavily API Key:")
os.environ["LANGCHAIN_TRACING_V2"] = "true"
os.environ["LANGCHAIN_API_KEY"] = getpass.getpass("LangSmith API Key:")
-
-
- Setting Up Tools and the Model: We’ll use Tavily Search as our tool, and set up a tool executor to invoke these tools. For the model, we’ll use the Chat OpenAI model from the LangChain integration, ensuring it’s initialized with streaming enabled. This enables us to stream back tokens and attach the functions we want the model to call.
-
from langchain_community.tools.tavily_search import TavilySearchResults
from langchain_openai import ChatOpenAI
from langgraph.prebuilt import ToolExecutor
from langchain.tools.render import format_tool_to_openai_function
tools = [TavilySearchResults(max_results=1)]
tool_executor = ToolExecutor(tools)
# We will set streaming=True so that we can stream tokens
# See the streaming section for more information on this.
model = ChatOpenAI(temperature=0, streaming=True)
functions = [format_tool_to_openai_function(t) for t in tools]
model = model.bind_functions(functions)
-
-
- Defining Agent State: The agent state is a simple dictionary with a key for a list of messages. We’ll use an ‘add to’ annotation so that any updates from nodes to this messages list will accumulate over time.
-
from typing import TypedDict, Annotated, Sequence
import operator
from langchain_core.messages import BaseMessage


class AgentState(TypedDict):
    messages: Annotated[Sequence[BaseMessage], operator.add]
-
-
- Creating Nodes and Edges: Nodes do the work, and edges connect them. We need an agent node to call the language model and get a response, an action node to see if there are any tools to be called, and a function to determine if we should proceed to tool calling or finish.
-
from langgraph.prebuilt import ToolInvocation
import json
from langchain_core.messages import FunctionMessage

# Define the function that determines whether to continue or not
def should_continue(state):
    messages = state['messages']
    last_message = messages[-1]
    # If there is no function call, then we finish
    if "function_call" not in last_message.additional_kwargs:
        return "end"
    # Otherwise if there is, we continue
    else:
        return "continue"

# Define the function that calls the model
def call_model(state):
    messages = state['messages']
    response = model.invoke(messages)
    # We return a list, because this will get added to the existing list
    return {"messages": [response]}

# Define the function to execute tools
def call_tool(state):
    messages = state['messages']
    # Based on the continue condition
    # we know the last message involves a function call
    last_message = messages[-1]
    # We construct an ToolInvocation from the function_call
    action = ToolInvocation(
        tool=last_message.additional_kwargs["function_call"]["name"],
        tool_input=json.loads(last_message.additional_kwargs["function_call"]["arguments"]),
    )
    # We call the tool_executor and get back a response
    response = tool_executor.invoke(action)
    # We use the response to create a FunctionMessage
    function_message = FunctionMessage(content=str(response), name=action.tool)
    # We return a list, because this will get added to the existing list
    return {"messages": [function_message]}
-
-
- Building the Graph: We create a graph with the agent state, add nodes for the agent and action, and set the entry point to the agent node. Conditional edges are added based on whether the agent should continue or end, and a normal edge always leads back to the agent after an action.
-
from langgraph.graph import StateGraph, END
# Define a new graph
workflow = StateGraph(AgentState)

# Define the two nodes we will cycle between
workflow.add_node("agent", call_model)
workflow.add_node("action", call_tool)

# Set the entrypoint as `agent`
# This means that this node is the first one called
workflow.set_entry_point("agent")

# We now add a conditional edge
workflow.add_conditional_edges(
    # First, we define the start node. We use `agent`.
    # This means these are the edges taken after the `agent` node is called.
    "agent",
    # Next, we pass in the function that will determine which node is called next.
    should_continue,
    # Finally we pass in a mapping.
    # The keys are strings, and the values are other nodes.
    # END is a special node marking that the graph should finish.
    # What will happen is we will call `should_continue`, and then the output of that
    # will be matched against the keys in this mapping.
    # Based on which one it matches, that node will then be called.
    {
        # If `tools`, then we call the tool node.
        "continue": "action",
        # Otherwise we finish.
        "end": END
    }
)

# We now add a normal edge from `tools` to `agent`.
# This means that after `tools` is called, `agent` node is called next.
workflow.add_edge('action', 'agent')

# Finally, we compile it!
# This compiles it into a LangChain Runnable,
# meaning you can use it as you would any other runnable
app = workflow.compile()
-
-
- Compiling and Using the Graph: After compiling the graph, we create an input dictionary with a messages key. Running the graph will process these messages, adding AI responses, function results, and final outputs to the list of messages.
-
from langchain_core.messages import HumanMessage

inputs = {"messages": [HumanMessage(content="what is the weather in sf")]}
app.invoke(inputs)
-
-
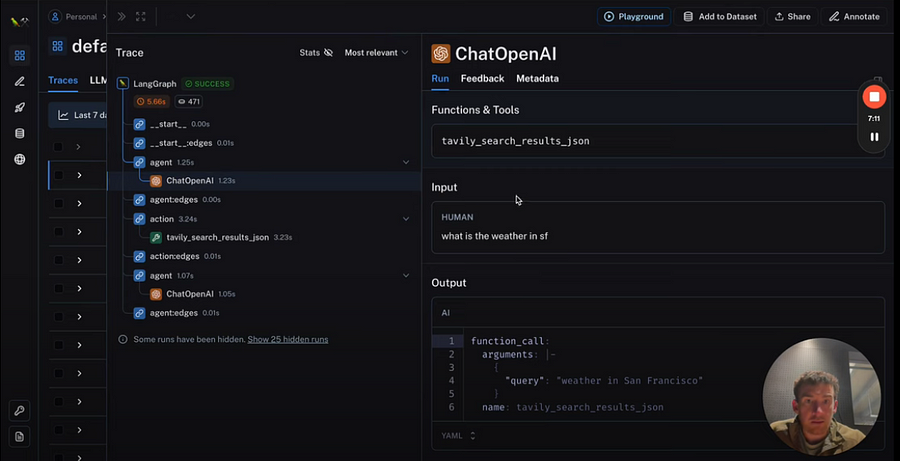
- Observing Under the Hood: Using LangSmith, we can see the detailed steps taken by our agent, including the calls made to OpenAI and the resulting outputs.
-
-
-
- Streaming Capabilities: LangGraph also offers streaming capabilities, which we’ll explore in more detail in video.
-
How to modify humans in a loop
let’s modify the Chat Agent Executor in LangGraph to include a ‘human in the loop’ component. This addition allows for human validation of tool actions before they are executed.
We’ll build on the base notebook we’ve previously worked on. If you haven’t gone through that notebook, I recommend reviewing it first, as this video will mainly focus on the modifications we make to it.
Setting Up: The initial setup remains the same. There are no additional installations needed. We’ll create our tool, set up the tool executor, prepare our model, bind tools to the model, and define the agent state — all as we did in the previous session.
Key Modification — Call Tool Function: The major change comes in the call tool function. We’ve added a step where the system prompts the user (that’s you!) in the interactive IDE, asking whether to proceed with a particular action. If the user responds ‘no’, an error is thrown, and the process stops. This is our human validation step.
# Define the function to execute tools
def call_tool(state):
    messages = state['messages']
    # Based on the continue condition
    # we know the last message involves a function call
    last_message = messages[-1]
    # We construct an ToolInvocation from the function_call
    action = ToolInvocation(
        tool=last_message.additional_kwargs["function_call"]["name"],
        tool_input=json.loads(last_message.additional_kwargs["function_call"]["arguments"]),
    )
    response = input(prompt=f"[y/n] continue with: {action}?")
    if response == "n":
        raise ValueError
    # We call the tool_executor and get back a response
    response = tool_executor.invoke(action)
    # We use the response to create a FunctionMessage
    function_message = FunctionMessage(content=str(response), name=action.tool)
    # We return a list, because this will get added to the existing list
    return {"messages": [function_message]}
Using the Modified Executor: When we run this modified executor, it will ask for approval before executing any tool action. If we approve by saying ‘yes’, it proceeds as normal. However, if we say ‘no’, it raises an error and halts the process.
utput from node 'agent':
---
{'messages': [AIMessage(content='', additional_kwargs={'function_call': {'arguments': '{\n  "query": "weather in San Francisco"\n}', 'name': 'tavily_search_results_json'}})]}

---

---------------------------------------------------------------------------
ValueError                                Traceback (most recent call last)
Cell In[10], line 4
      1 from langchain_core.messages import HumanMessage
      3 inputs = {"messages": [HumanMessage(content="what is the weather in sf")]}
----> 4 for output in app.stream(inputs):
      5     # stream() yields dictionaries with output keyed by node name
      6     for key, value in output.items():
      7         print(f"Output from node '{key}':")
This is a basic implementation. In a real-world scenario, you might want to replace the error with a more sophisticated response and use a more user-friendly interface instead of a Jupyter Notebook. But this gives a clear idea of how you can add a simple yet effective human-in-the-loop component to your LangGraph agents
Modify Managing Agent Steps
let’s take a look at modifying the Chat Agent Executor in LangGraph to manipulate the internal state of the agent as it processes messages.
This tutorial builds on the basic Chat Agent Executor setup, so if you haven’t gone through the initial setup in the base notebook, please do that first. We’ll focus here only on the new modifications.
Key Modification — Filtering Messages: The primary change we’re introducing is a way to filter the messages passed to the model. You can now customize which messages the agent considers. For instance:
def call_model(state):
    messages = state['messages'][-5:]
    response = model.invoke(messages)
    # We return a list, because this will get added to the existing list
    return {"messages": [response]}
-
-
- Selecting only the five most recent messages.
- Including the system message plus the five latest messages.
- Summarizing messages that are older than the five most recent ones.
-
This modification is a minor but powerful addition, allowing you to control how the agent interacts with its message history and improves its decision-making process.
Using the Modified Executor: The implementation is straightforward. You won’t see a difference with just one input message, but the essential part is that any logic you wish to apply to the agent’s steps can be inserted into this new modification section.
This method is ideal for modifying the Chat Agent Executor, but the same principle applies if you’re working with a standard agent executor.
Force-calling a Tool
we’ll be making a simple but effective modification to the Chat Agent Executor in LangGraph, ensuring that a tool is always called first. This builds on the base Chat Agent Executor notebook, so make sure you’ve checked that out for background information.
Key Modification — Forcing a Tool Call First: Our focus here is on setting up the chat agent to call a specific tool as its first action. To do this, we’ll add a new node, which we’ll name ‘first model node’. This node will be programmed to return a message instructing the agent to call a particular tool, such as the ‘Tavil search results Json’ tool, with the most recent message content as the query.
# This is the new first - the first call of the model we want to explicitly hard-code some action
from langchain_core.messages import AIMessage
import json

def first_model(state):
    human_input = state['messages'][-1].content
    return {
        "messages": [
            AIMessage(
                content="",
                additional_kwargs={
                    "function_call": {
                        "name": "tavily_search_results_json",
                        "arguments": json.dumps({"query": human_input})
                        }
                    }
                )
            ]
    }
Updating the Graph: We’ll modify our existing graph to include this new ‘first agent’ node as the entry point. This ensures that the first agent node is always called first, followed by the action node. We set up a conditional node from the agent to the action or end, and a direct node from the action back to the agent. The crucial addition is a new node from the first agent to action, guaranteeing that the tool call happens right at the start.
from langgraph.graph import StateGraph, END
# Define a new graph
workflow = StateGraph(AgentState)

# Define the new entrypoint
workflow.add_node("first_agent", first_model)

# Define the two nodes we will cycle between
workflow.add_node("agent", call_model)
workflow.add_node("action", call_tool)

# Set the entrypoint as `agent`
# This means that this node is the first one called
workflow.set_entry_point("first_agent")

# We now add a conditional edge
workflow.add_conditional_edges(
    # First, we define the start node. We use `agent`.
    # This means these are the edges taken after the `agent` node is called.
    "agent",
    # Next, we pass in the function that will determine which node is called next.
    should_continue,
    # Finally we pass in a mapping.
    # The keys are strings, and the values are other nodes.
    # END is a special node marking that the graph should finish.
    # What will happen is we will call `should_continue`, and then the output of that
    # will be matched against the keys in this mapping.
    # Based on which one it matches, that node will then be called.
    {
        # If `tools`, then we call the tool node.
        "continue": "action",
        # Otherwise we finish.
        "end": END
    }
)

# We now add a normal edge from `tools` to `agent`.
# This means that after `tools` is called, `agent` node is called next.
workflow.add_edge('action', 'agent')

# After we call the first agent, we know we want to go to action
workflow.add_edge('first_agent', 'action')

# Finally, we compile it!
# This compiles it into a LangChain Runnable,
# meaning you can use it as you would any other runnable
app = workflow.compile()
Using the Modified Executor: When we run this updated executor, the first result comes back quickly because we bypass the initial language model call and go straight to invoking the tool. This is confirmed by observing the process in LangSmith, where we can see that the tool is the first thing invoked, followed by a language model call at the end.
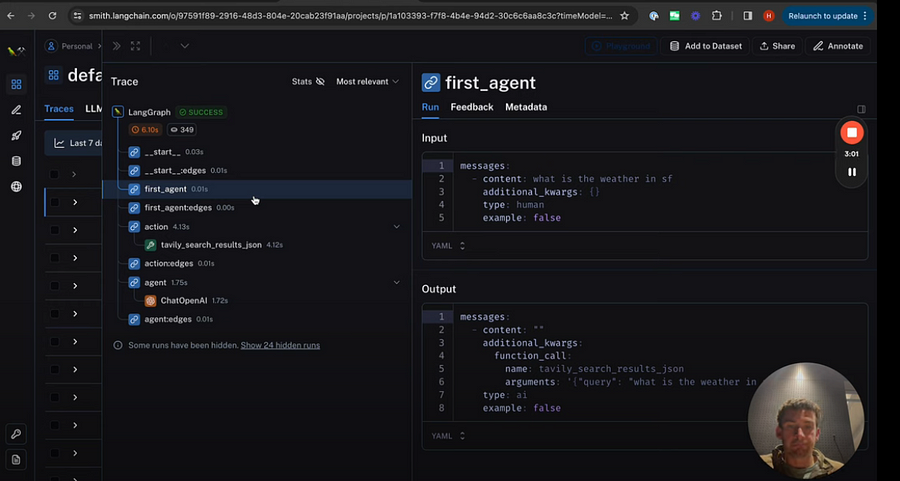
This modification is a simple yet powerful way to ensure that specific tools are utilized immediately in your chat agent’s workflow.
Else See: CrewAi + Solor/Hermes + Langchain + Ollama = Super Ai AgentConclusion :
And that’s a wrap! you know how to build a hyper AI agent. I hope you have gained a cursory understanding of langGraph capabilities. As a next step, try exploring LangGraph to build more interesting applications.
References :
-
- https://github.com/langchain-ai/langgraph/blob/main/examples/agent_executor/base.ipynb
- https://github.com/langchain-ai/langgraph/blob/main/examples/chat_agent_executor_with_function_calling/base.ipynb
- https://github.com/langchain-ai/langgraph/blob/main/examples/chat_agent_executor_with_function_calling/human-in-the-loop.ipynb
- https://github.com/langchain-ai/langgraph/blob/main/examples/chat_agent_executor_with_function_calling/managing-agent-steps.ipynb
- https://github.com/langchain-ai/langgraph/blob/main/examples/chat_agent_executor_with_function_calling/force-calling-a-tool-first.ipynb


