What is AutoGen ?
Autogen Microsoft is a project by Microsoft that allows you to create as many autonomous agents as you want and have them work together to do things. It’s a framework that allows agents, which will be described later, to talk to each other and solve tasks. It’s flexible and lets people make changes while using different tools.
An agent is a mechanism that decides what to do next and takes action based on that decision. Game AI is also a type of agent that observes the board and thinks about the next move before making a move.
In the area of reinforcement learning (human feedback), approaches to learning behavior have been used for a long time.
Recently, by leveraging the flexibility of LLM, we can now plan the next step without learning, thanks to agents such as AutoGPT and code interpreters.
Furthermore, the agent mechanism is already open-source, such as Langchain.
However, although the LLM Agent gives the action policy through prompts, it has been difficult to perform very complex tasks due to the performance of LLM and the limitations of the information that can be given through prompts.
Therefore, when connecting multiple agents, we can expect to be able to execute tasks that are more difficult than a single agent.
Examples of such multi-agent mechanisms include mechanisms such as Camel and ChatDEV
Although such a mechanism did exist in open-source software , building it from scratch proved to be a challenging.
Autogen Python, on the other hand, is a framework designed for creating such a complex multi-agent conversation system. It offers customizable and conversable agents, Harnessing the best abilities of cutting-edge LLMs, and I intend to give it a try.
 refrence : by Microsoft
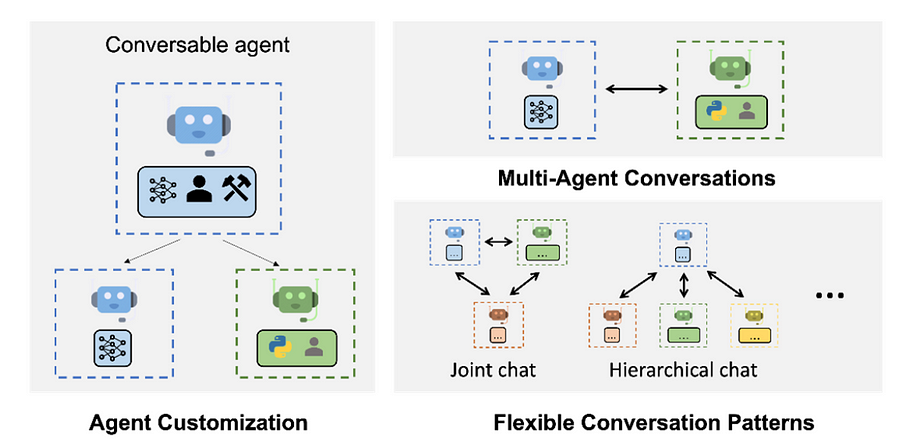
Figure 1. AutoGen enables complex LLM-based workflows using multi-agent conversations.
(Left) AutoGen agents are customizable and can be based on LLMs, tools, humans, and even a combination of them. (Top-right) Agents can converse to solve tasks.
(Bottom-right) The framework supports many additional complex conversation patterns.
Let’s Try FizzBuzz problem for Simple desmonstration
Let’s create a code that solves the simplest problem , execute it , and then walk through the steps to implement a simple fix. i
In another hand ,FizzBuzz is a group word game for childern to teach them about divison.
The word “Fizz” any number divisible by three and the word “buzz” and number divisble by five, and any number divisible by both 3 and 5 with word “FizzBuzz”.
1. Set up your environment
The code created by the Agent can be executed in a variety of environments, such as within Colab, Docker, or in the original environment.
In this article, we will focus on a simple thing called FizzBuzz so that we can run it under the basic environment.
When generating and executing more complex code, it becomes necessary to install a library into the execution environment, but it is painful to have the environment dirty, so Colab and Docker are preferable as the execution environment.
Especially when using Docker, it was convenient to be able to create an image with the libraries installed in advance. Let’s try this next time as well.
In addition, I will try it in the next article, but if you want to display a graph like matplotlib, you will need to use a plain environment.
Initial Setting
Initially, we must configure the Open API key, among other things. to do this, we will generate an OAI_CONFIG_LIST file by referencing the OAI_CONFIG_LIST_sample located in the autogen’s root directory. for our purposes, we’ll exclusively use the ‘gpt-4’. Place this file in the same directory as the script you will run later
[
    {
        "model": "gpt-4",
        "api_key": "<your OpenAI API key here>"
    }
]
let’s try it out
To begin, let’s execute the following code. If the use_docker flag is set to False, it will run within your local Python environment.
Please make sure to install pip install pyautogen
from autogen import AssistantAgent, UserProxyAgent, config_list_from_json

code_execution_config = {
    "work_dir": "coding",
    "use_docker": False
}
config_list = config_list_from_json(env_or_file="OAI_CONFIG_LIST")
assistant = AssistantAgent("assistant", llm_config={"config_list": config_list})
user_proxy = UserProxyAgent("user_proxy", code_execution_config=code_execution_config)

message = "Create and run the FizzBuzz code."
user_proxy.initiate_chat(assistant, message=message)
the expected outcome of the execution should resemble the following, where you will observe the generation of what appears to be the FizzBuzz code.
assistant (to user_proxy):

This is a very common coding challenge. The task is to print numbers from 1 to 100, but for multiples of 3 print "Fizz" instead of the number and for the multiples of 5 print "Buzz". For numbers which are multiples of both three and five print "FizzBuzz".

Here is the Python code that accomplishes the task:

```python
# filename: fizzbuzz.py

for num in range(1, 101):
    if num % 3 == 0 and num % 5 == 0:
        print('FizzBuzz')
    elif num % 3 == 0:
        print('Fizz')
    elif num % 5 == 0:
        print('Buzz')
    else:
        print(num)
```

To run this script, save it into a file called `fizzbuzz.py`, then run it using Python in a terminal:

```shell
python3 fizzbuzz.py
troubleshooting
Additional information will be provided here as required. For now, if you are using python3/pip3, we will configure it to function with python/pip. Furthermore, in Docker mode, please ensure that the docker is running and verify that the base model python:3-alpine) is adequately equipped.
Lets explain the code

autogen docs(opens in new tab) (in preview) is freely available as a Python package. To install it, run
i will explain the code , we will use the following three
from autogen import AssistantAgent, UserProxyAgent, config_list_from_json
we going create AssistantAgent. AssistantAgent is a module that executes LLM, and in FizzBuzz, it is a module that creates source code. Enter the API to be used and its key as config
The LLM inference configuration in AssistantAgent can be configured via llm_cofig.
config_list = config_list_from_json(env_or_file="OAI_CONFIG_LIST")
assistant = AssistantAgent("assistant", llm_config={"config_list": config_list})
Next , let’s establish a UserProxyAgent. a module designed to engage with individuals and execute source code. Configure the execution enivronment and other relevant settings using the code_execution_config.
code_execution_config = {
    "work_dir": "coding",
    "use_docker": False
}
user_proxy = UserProxyAgent(
    "user_proxy",
    code_execution_config=code_execution_config
)
Finally , provide instruction and run the code . Once this step is completed , the remainder of the process should rest automatically.
Conclusion
For now , we have successsfully executed some simple code. in the next article , we will delve into more complex code excution ascenarios, explore the use of agents beyond code and the AutoGen’s functionalities , providing through explanation
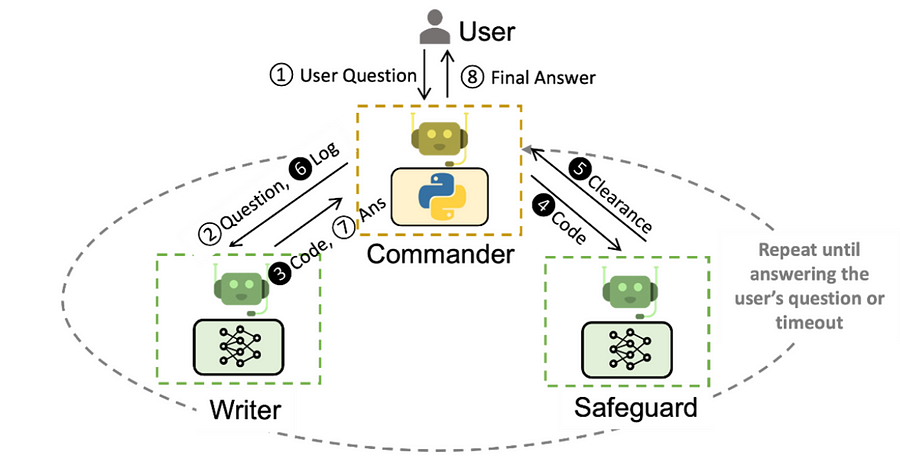
With AutoGen, building a complex multi-agent conversation system boils down to:
- Defining a set of agents with specialized capabilities and roles.
- Defining the interaction behavior between agents, i.e., what to reply when an agent receives messages from another agent.
More ideas on My Homepage:


Very good site you have here but I was wondering if you knew of any user discussion forums that cover
the same topics discussed here? I’d really like to be a part of
online community where I can get advice from other
knowledgeable individuals that share the same interest. If you have any recommendations, please let me know.
Cheers!